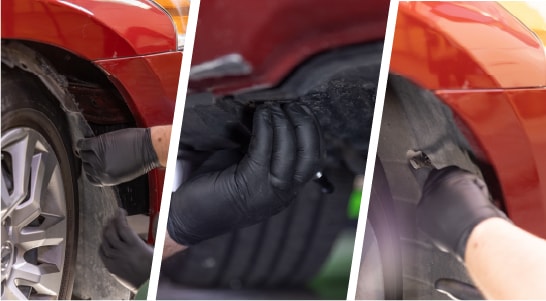
We'll be accessing the headlight bulbs through the wheel wells, so turn the steering wheel to give yourself a little more room to work. Use a flathead screwdriver or trim tool to remove the push clips, two screws, and a bolt underneath the vehicle in front of the wheel well securing the splash guard. Once you've removed the fasteners, move the splash guard to the side.
How to Replace the Headlight Bulb in a 2013 to 2018 Nissan Altima
Your Nissan Altima’s headlights not only offer visibility when driving at night or during inclement weather, but also ensure others know that your car is there. If you notice that your 2013–2018 Nissan Altima’s headlight bulbs are dimming, flickering, malfunctioning, or have completely failed, your Altima likely needs new headlight bulbs. Since headlight bulbs wear out on both sides at a similar rate, it’s best to replace both of your Altima’s headlight bulbs at the same time. Malfunctioning headlights can reduce your visibility and compromise others’ ability to see your car. Choosing the right headlight bulbs and performing a headlight bulb replacement is a straightforward but crucial automotive maintenance task to help keep you safe on the road and abiding by traffic laws. Learn how to replace headlight bulbs on most 2013 to 2018 Nissan Altima models with our comprehensive guide.
Tools & Materials
Step-By-Step Instructions to Replace the Headlight Bulb on Your Altima
Step 1: Remove the Splash Guard Securing Your Nissan Altima
Step 2: Disconnect Your Headlight Bulb
With the splash guard out of the way, you'll see the back of your headlight bulbs. Press in on the lock tab to detach the bulb from the wiring harness. Grip the back of the bulb you need to change and turn it counterclockwise to disengage the tab securing it.
Step 3: Connect New Headlight Bulb
Press the base of the bulb into the wiring harness until you hear it snap into place. Lift the bulb into its opening, and turn it clockwise to engage the tabs that secure it. Before attaching the splashguard in the wheel well, turn your lights on to make sure the bulb is working.
|
Do It Right: As you position your new bulb, make sure not to touch it with your bare fingers. Oil or grease from your hands can create hot spots on the glass and cause it to burn out prematurely. |
Step 4: Reattach Splash Guard Securing Your Nissan Altima
If everything looks good, use the fasteners you removed earlier to secure the splash guard. Headlight bulbs should always be changed in pairs, so repeat these steps on the other side.
Additional Resources
O’Reilly Auto Parts offers a range of headlight bulbs, tail light bulbs, and other exterior light bulbs to fit 2013–2018 Nissan Altima models, and can help you save time and money on necessary repairs. If your Nissan Altima’s headlights are dim, burned-out, or otherwise malfunctioning, it’s best to promptly replace both of your car’s headlight bulbs to restore optimal visibility and headlight function. O’Reilly Auto Parts offers a range of headlight bulbs, tail light bulbs, and other exterior light bulbs to fit 2013-2018 Nissan Altima models, and can help you save time and money on necessary repairs. Learn more about your vehicle and diagnose lighting issues with helpful topics in our How-To Hub including how to fix dim headlights, HID vs. LED bulbs, and much more.
The automotive repair work depicted in this series is performed under the direction of the manufacturer of the product featured. Prior to undertaking any of the demonstrated repairs on your vehicle, we suggest you consult with a certified mechanic or another professional who can adequately advise you of the proper repair or remedy required. O’Reilly Automotive Stores, Inc. and its affiliates (“O’Reilly”) disclaims any responsibility for injury or damage resulting from a viewer’s attempt to recreate the repairs shown in this series.
Safety Glasses
Safety Gloves
Sylvania Headlight Bulbs
Trim Removal Tool