
 Safety Glasses
 Nitrile Gloves
 Cabin Air Filter
The cabin air filter in your 2003 to 2007 Honda Accord plays a crucial role in filtering out dust, allergens, dirt, pollutants, and other contaminants from the outside air before entering your vehicle's cabin. This ensures that the air circulated by your A/C and heating system is as clean as possible.
Replacing the cabin air filter in your 2003 to 2007 Honda Accord can also enhance the performance and airflow of your A/C system. Signs of a dirty cabin air filter may include unpleasant odors from the vents, air conditioning issues or less cold air, or reduced airflow. To determine the best time to replace your Accord's cabin air filter, refer to your owners manual for recommended maintenance intervals. Keep allergens at bay and enjoy cleaner air inside your vehicle by following these detailed instructions for replacing your Accord's cabin air filter.

Step 1: Prepare Your Accord


Step 2: Remove Your Old Filter

Step 3: Install Your New Filter
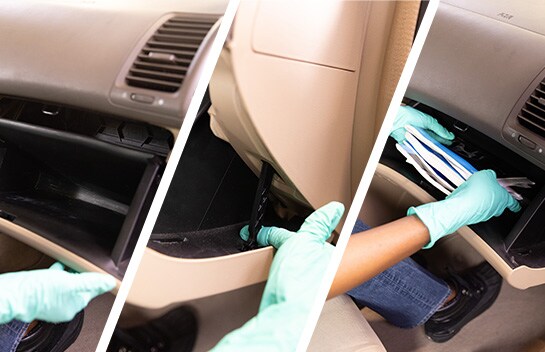
Step 4: Reinstall Your Glove Compartment
Replace any items you removed from the glove box and close it.


These step-by-step instructions explain how to remove and replace the cabin air filter on a 2003 Honda Accord LX, and will be similar to repair procedures for other 2003 to 2007 Honda Accord models. By installing a new cabin air filter, you can improve airflow and A/C performance, as it effectively removes contaminants from the air before it enters your vehicle's cabin and ensures consistent air passage. While the owners manual provides a recommended replacement interval for your 2003 to 2007 Honda Accord, you may want to replace the filter more frequently, especially if you drive in dusty or polluted conditions, to maintain optimal cabin airflow, air quality, and overall comfort.
The automotive repair work depicted in this series is performed under the direction of the manufacturer of the product featured. Prior to undertaking any of the demonstrated repairs on your vehicle, we suggest you consult with a certified mechanic or another professional who can adequately advise you of the proper repair or remedy required. O’Reilly Automotive Stores, Inc. and its affiliates (“O’Reilly”) disclaims any responsibility for injury or damage resulting from a viewer’s attempt to recreate the repairs shown in this series.