Warning Sorry, you're using a web browser that is no longer supported. For the best experience please upgrade or visit the site on another browser.
Skip to content

How to Change the Battery in a 2011 to 2015 Honda CR-V

The following video details how to replace a car battery in a 2012 Honda CR-V. Repair instructions will be similar for 2011, 2013, 2014, and 2015 Honda CR-V models. Over time, car batteries degrade and eventually fail due to age, usage, climate conditions, and general driving habits. It’s recommended to inspect and test your car battery regularly to ensure reliable starting and performance. If you need to have your car battery tested, O’Reilly Auto Parts offers free battery testing store services at all locations. Be sure to consult your owner's manual for exact inspection and replacement specifications before beginning your project.

Tools & Materials List

Step-by-Step Instructions

Additional Resources

Tools & Materials

Step-By-Step Instructions to Change a CR-V Battery

Replacing the car battery in your 2011-2015 Honda CR-V is a crucial automotive maintenance task that ensures your vehicle starts reliably. Automotive batteries help start and run your car, and also power electrical accessories while the engine is off, including the radio, power windows and seats, door locks, and more. By learning to replace a car battery yourself with our helpful step-by-step instructions and video, you can save both time and money on your repair.

Our expert opens the hood of a 2012 Honda CR-V.

Step 1: Prepare Your Honda

Make sure the ignition switch is in the LOCK position, and pop the hood. Your battery is at the front of the engine bay on the driver’s side.

In two images, the old battery in the Honda is disconnected using a socket.

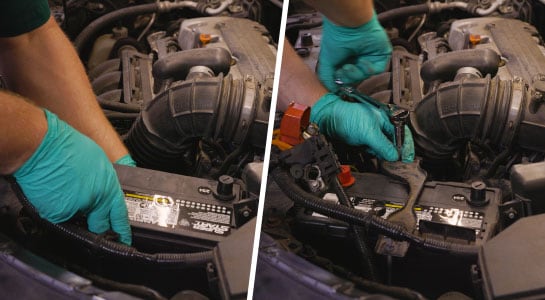
Step 2: Disconnect the Old Battery

Use your 10mm wrench or ratchet and 10mm deep socket to loosen the nut on the negative battery terminal then disconnect and isolate the cable.

Our expert uses the socket to loosen the battery hold-down and remove both the hold-down and the battery.

Repeat this step for the positive cable. Use the same tool to loosen the nuts securing the battery hold-down and remove it.

The empty battery tray is checked for any damage before installing the new battery.

Step 3: Check Battery Tray

Inspect the battery tray for any signs of corrosion or other damage, and remove any debris to prepare it for the new battery to be installed.

In two images, our expert installs the new battery and reattached the battery hold-down into the Honda CR-V.

Step 4: Install the New Battery

Set your new battery in the tray in the same orientation as the old one, with the positive terminal toward the front of the vehicle. Reposition the battery hold-down, making sure its hooked ends catch before tightening the nuts until they’re snug.

Do It Right: After installing the battery, be sure to re-attach the protective battery terminal caps.

In two images, our expert reconnects the battery cables to the new battery using the socket wrench from earlier and closes the hood.

Step 5: Reconnect the Battery Cables

Starting with the positive cable then the negative, reconnect the battery cables to the new battery. Tighten the battery terminal nuts. Close the hood.

Our expert holds the Honda CR-V’s owner’s manual.

When you start your vehicle after disconnecting the battery, your display may ask for a five-digit code to load your presets. You’ll find that code in your owner’s manual.

Additional Resources

Car batteries supply the essential electrical power needed to start the engine, operate the lights, and power various other electrical systems in your Honda CR-V. If you’re unsure of your battery’s health, enjoy our free battery testing and free alternator testing services at all O’Reilly Auto Parts locations to help you properly diagnose your Honda CR-V. Learn more about your car battery with our helpful How-To Hub resources, including how to care for a car battery, choosing the best automotive battery, and much more for a complete, confident repair.

The automotive repair work depicted in this series is performed under the direction of the manufacturer of the product featured. Prior to undertaking any of the demonstrated repairs on your vehicle, we suggest you consult with a certified mechanic or another professional who can adequately advise you of the proper repair or remedy required. O’Reilly Automotive Stores, Inc. and its affiliates (“O’Reilly”) disclaims any responsibility for injury or damage resulting from a viewer’s attempt to recreate the repairs shown in this series.