Warning Sorry, you're using a web browser that is no longer supported. For the best experience please upgrade or visit the site on another browser.
Skip to content

How to Change the Air Filter in a 2009 to 2014 Ford F150

Learn how to check, remove, and replace the air filter in your Ford F-150 with these step-by-step instructions. This video demonstrates an air filter replacement on a 2014 Ford F-150 XLT with a 5.0 liter engine, and the procedure will be similar for 2009, 2010, 2011, 2012, 2013, 2015, 2016, and 2017 Ford F-150 models, as well as Ford Expedition models from 2007 to 2020. Replacement steps will also be similar for Ford F-250 Super Duty, Ford F-350 Super Duty, Ford F-450 Super Duty, Ford F-550 Super Duty models from 2008 to 2016. Replacing the air filter on your Ford helps to better isolate contaminants from the outside air before debris is permitted to enter the engine, and can improve your engine’s performance and gas mileage. Your 2009 to 2014 Ford F-150’s owner’s manual will list an air filter replacement interval, but if you notice a dirty or clogged air filter or reduced fuel economy, you can replace the air filter as frequently as required to ensure optimal performance.


Tools & Materials List

Step by Step Instructions:

Tools & Materials

How to Change the Air Filter in a 2009 to 2014 Ford F-150

Your Ford F-150’s air filter helps trap and remove dust, dirt, and contaminants from the outside air before it enters your vehicle’s engine. Changing your 2009 to 2014 Ford F-150’s air filter is a simple regular maintenance task that can improve the truck’s fuel economy and engine performance as well as helping your engine run at its best and last as long as possible. It’s recommended that you change most vehicle’s air filters every 12,000 to 15,000 miles, but your Ford’s service manual will provide the manufacturer’s suggested maintenance interval. A clogged air filter can cause your vehicle to misfire, make unusual engine noises, or you may smell gas when starting your F-150 if the air filter is severely obstructed. Our detailed, step-by-step instructions will help you perform an air filter replacement on your 2009 to 2014 Ford F-150 and help your truck running and performing at its best. If you’re not completely comfortable doing this yourself, we’d be happy to recommend a professional technician in your area.

Locate Old Filter

Close-up shot of the three clips that secure the air filter housing being unfastened.

Step 1: Locate Old Air Filter

Park on a level surface and open the hood. The air filter housing is on the driver’s side of the engine bay, and is secured by four bolts.
Chris uses a flathead screwdriver to loosen the hose clamp. Chris detaches the MAF sensor from the air filter housing lid.

Step 2: Open the Air Filter Housing

Use a flathead screwdriver to loosen the hose clamp and gently work the hose off the housing. On the driver’s side of the housing, there are tabs that need to be slipped out of their slots. Open the air filter housing.

Do It Right: Your mass air flow sensor, or MAF sensor, will still be attached, so consider this as you carefully lay the lid of the housing to the side. The MAF sensor can also be detached if you want to completely remove the housing lid from the engine bay. If you detach it, make sure to reattach it before you close the hood.

Remove the Old Air Filter

Removes the old filter, compares them side-by-side and cleans out dirt and debris

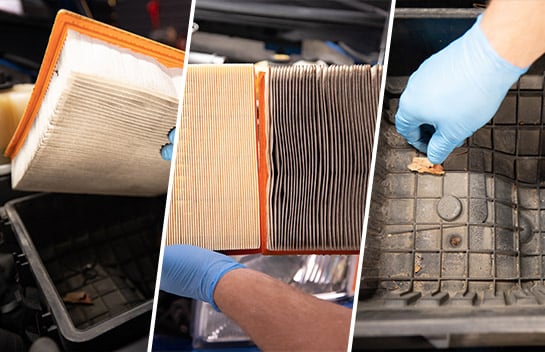
Step 3: Remove the Old Filter

Remove the old filter and clean out any leaves or debris from the inside of the air filter housing.

Install the New Air Filter

Chris installs the new filter, making sure the edges are lined up.

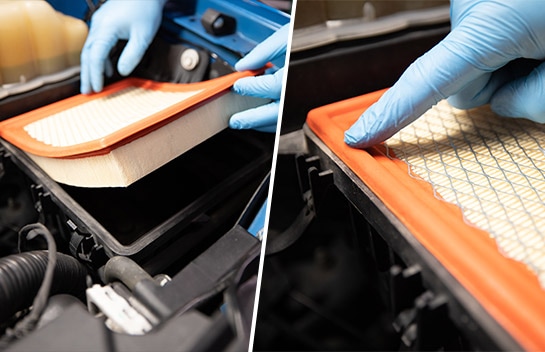
Step 4: Install the New Filter

Put your new air filter in place, making sure the edges are properly seated all the way around.
Chris replaces the air filter housing lid. Chris fasten the three clips to secure the filter housing lid. Chris reconnects the hose to the air filter housing.

Step 5: Replace the Air Filter Housing Lid

Replace the lid to the filter housing by slipping the tabs on the driver’s side back into their slots and work it back into the hose on the other side. Use your flathead screwdriver to retighten the hose clamp. Fasten the three clips securing the air housing lid. Once you’ve completed these steps, you can close the hood of your F-150.

Additional Resources

Learn how to check, remove, and replace the air filter in your Ford F-150 with these step-by-step instructions. This video demonstrates an air filter replacement on a 2014 Ford F-150 XLT with a 5.0 liter engine, and the procedure will be similar for 2009, 2010, 2011, 2012, 2013, 2015, 2016, and 2017 Ford F-150 models, as well as Ford Expedition models from 2007 to 2020. Replacement steps will also be similar for Ford F-250 Super Duty, Ford F-350 Super Duty, Ford F-450 Super Duty, Ford F-550 Super Duty models from 2008 to 2016. Replacing the air filter on your Ford helps to better isolate contaminants from the outside air before debris is permitted to enter the engine, and can improve your engine’s performance and gas mileage. Your 2009 to 2014 Ford F-150’s owner’s manual will list an air filter replacement interval, but if you notice a dirty or clogged air or reduced fuel economy, you can replace the air filter as frequently as required to ensure optimal performance.

The automotive repair work depicted in this series is performed under the direction of the manufacturer of the product featured. Prior to undertaking any of the demonstrated repairs on your vehicle, we suggest you consult with a certified mechanic or another professional who can adequately advise you of the proper repair or remedy required. O’Reilly Automotive Stores, Inc. and its affiliates (“O’Reilly”) disclaims any responsibility for injury or damage resulting from a viewer’s attempt to recreate the repairs shown in this series.