Warning Sorry, you're using a web browser that is no longer supported. For the best experience please upgrade or visit the site on another browser.
Skip to content

How to Replace the Radiator Hoses in a 2009 to 2014 Ford F-150

Your Ford F-150’s radiator hoses transport coolant to and from the radiator. The upper radiator hose transports warm coolant to the radiator to be cooled, while the lower radiator hose connects to the water pump, sending coolant back to the engine to keep your truck running cool. Radiator hoses can become cracked, split, dry, or collapsed, causing a lack of coolant movement, or you may see a coolant leak around the radiator hose clamps. When installing new radiator hoses on your Ford, it’s recommended that you inspect the hose clamps, and in most cases, use new clamps to ensure a complete repair. Coolant leaks can lead to overheating, which may cause engine damage or failure. Our step-by-step instructions will help you perform a radiator hose replacement on your Ford F-150.

Tools & Materials List

Step by Step Instructions

Prepare Your Vehicle

Replace the Upper Radiator Hose

Replace the Lower Radiator Hose

Refill Your Coolant System

Additional Resources

Tools & Materials

Step-by-Step Instructions to Replace Radiator Hoses in a 2009 to 2014 Ford F-150

Today we’ll be changing the radiator hoses on this 2012 Ford F-150, and procedures will be similar on a lot of 5-liter F-150s from 2009 to 2014, but be sure to know the specifics for your truck before getting started. If you’re not completely comfortable doing this yourself, we would be happy to recommend a professional technician in your area. Once you’ve got your supplies together, here’s what you’ll do:

Prepare the Vehicle

Mechanic placing a drain pan underneath a Ford F-150

Step 1: Place the Drain Pan Under the Truck

Wait for the engine to cool down, then place a fluid catch pan under the radiator petcock.
Mechanic using a screwdriver to open the radiator petcock

Step 2: Open the Radiator Petcock

Open the petcock and allow the coolant to drain into the drain pan.
Man using a ratchet to remove the air intake tube then lifting it out of the truck

Step 3: Remove the Air Intake Tube

Open the hood and disconnect the hoses and electrical connector, then remove the air intake tube.

Replace the Upper Radiator Hose

Mechanic using pliers to loosen clamps around the upper radiator hose

Step 4: Loosen the Radiator Hose Clamps

To replace the upper radiator hose, loosen the hose clamps at the radiator inlet and the water outlet on the engine.
Man holding an upper radiator hose

Step 5: Remove the Upper Radiator Hose

Pull the radiator hose free from the radiator inlet and the engine.

Do It Right: In some cases, you may need to use a pick, screwdriver, or something similar to break the seal between the hose and the radiator. If you’re not planning to reuse the hose, it can also be split to allow it to be removed more easily.

Mechanic holding new upper radiator hose in place on outlets

Step 6: Install the New Upper Radiator Hose

Now you can use your new hose and hose clamps and position the hose over the engine water outlet, then over the radiator inlet. Tighten the clamps to the manufacturer’s specifications.

Replace the Lower Radiator Hose

Man using pliers to detach the spring clamp from the thermostat housing

Step 7: Detach the Lower Radiator Hose Clamps

Detach the spring clamp at the thermostat housing outlet, then loosen the hose clamp over the radiator.

Do It Right: The lower radiator hose on your F-150 not only connects the radiator to the water pump, but also has provisions for the oil cooler.

Man removing the lower radiator tube from the radiator

Step 8: Loosen the Hose Clamps at the Radiator

After detaching the spring clamps from the thermostat housing, loosen the hose clamp at the radiator.
Man using a ratchet to loosen the clamps holding the oil cooler inlet and outlet hoses

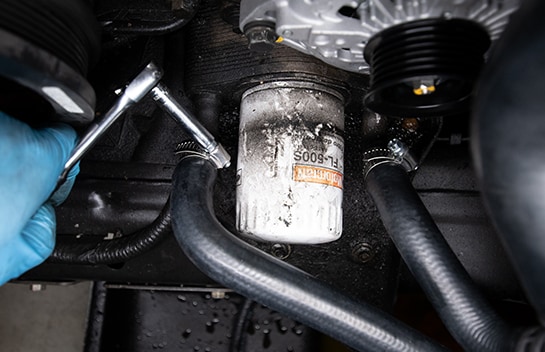
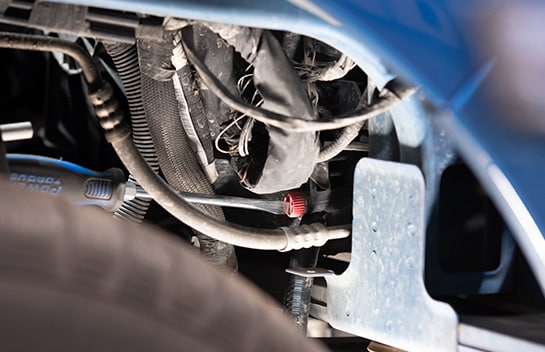
Step 9: Remove the Oil Cooler Inlet and Outlet Hoses

Remove the clamps from the oil cooler inlet and outlet hoses, then remove the hoses.
Man removing the house from the thermostat housing

Step 10: Remove the Lower Radiator Hose from the Housing

Now you can remove the hose from both the thermostat housing and the radiator.

Do It Right: As before, you may need to use a pick or screwdriver to loosen the radiator hose from the radiator, or you may just cut the hose since it will be discarded anyway.

Mechanic holding a new radiator hose to the radiator

Step 11: Install the New Lower Radiator Hose to the Radiator

Install the new lower radiator hose to the radiator with a new clamp and tighten to manufacturer’s specifications.
Mechanic using a ratchet to tighten the clamp

Step 12: Install the New Lower Radiator Hose to the Thermostat Housing

Reinstall the thermostat outlet hose and re-engage the spring clamp.
Mechanic using a ratchet to tighten the oil cooler outlet hoses

Step 13: Reinstall the Oil Cooler Inlet and Outlet Hoses

Install the oil cooler inlet and outlet hoses with new clamps and tighten to manufacturer’s specifications.

Refill Your Cooling System

Mechanic pouring O’Reilly Auto Parts coolant into the Ford F-150

Step 14: Refill Your Cooling System

Fill your cooling system and start your F-150 to check for leaks. Remove your drain pan, start your vehicle, and let it warm up to operating temperature with your heater on. If the heater is blowing warm air, turn the truck off and check your coolant level. Add coolant as needed, and close the hood.

Additional Resources

These step-by-step instructions and video detail the procedure for radiator hose replacement on a 2012 Ford F-150, and will be similar to replacement procedures for 2006, 2007, 2008, 2009, 2010, 2011, 2013 and 2014 Ford F-150s equipped with a 5.0-liter engine. The replacement procedures will also be similar for select Ford F-150 FX2, FX4, King Ranch, Lariat, PLatinum, STX, XL, and XLT models with a 5L engine from 2011, 2012, 2013, and 2014. If you notice your truck’s radiator hoses are dry, splitting, or collapsed, or if you notice a coolant leak, you should repair your radiator hoses as soon as possible to prevent low coolant levels, which can lead to overheating and engine failure. Learn to easily replace your Ford’s radiator hoses to keep your truck running cool.

The automotive repair work depicted in this series is performed under the direction of the manufacturer of the product featured. Prior to undertaking any of the demonstrated repairs on your vehicle, we suggest you consult with a certified mechanic or another professional who can adequately advise you of the proper repair or remedy required. O’Reilly Automotive Stores, Inc. and its affiliates (“O’Reilly”) disclaims any responsibility for injury or damage resulting from a viewer’s attempt to recreate the repairs shown in this series.