
 Safety Glasses
 Nitrile Gloves
 Edelbrock Carburetors
 Edelbrock Fuel Line Kits
 Edelbrock Fuel Filters

To determine the best air flow for your carburetor, take your Engine Size and multiply it by the maximum Revolutions per Minute (RPM), divided by 3456.
Today we’re working on a slightly modified 350 Chevrolet. Since this car is a cruiser, we’ll be assuming that maximum RPM might be around 6000. Using the above formula, we chose an Edelbrock 1406, which delivers 600 CFM. This carburetor is available on the shelf at most O’Reilly Auto Parts locations.
In addition to our carburetor, there are a couple of accessories we’d always recommend. First is a fuel inlet pipe and inline fuel filter to make sure that the fuel reaching our carburetor is free from clogs caused from debris.
Also, before you install the carburetor make sure all your basic maintenance is done, including making sure that your spark plugs, wires, air filter, PCV valve, and more are in top condition.

Check your fuel pressure while the engine is idling, if possible. Edelbrock carburetors can handle up to 6.5psi, but 5.5psi is ideal to reduce the risk of flooding while delivering plenty of fuel to the engine.
Fuel pressure can be tested off the fuel inlet pipe using the 1/8” NPT port and the O’Reilly loaner tool fuel pressure gauge.
Fuel pressure can be tested off the fuel inlet pipe using the 1/8” NPT port and the O’Reilly loaner tool fuel pressure gauge.
|
Do It Right: You can permanently mount a gauge to the pipe and quickly check fuel pressure any time. If the fuel pressure is too high, a pressure regulator may also need to be installed in the system before continuing. |
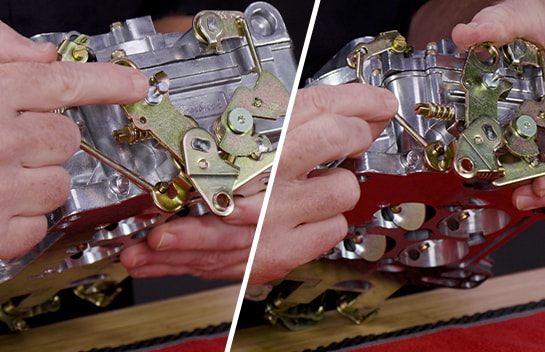
Your throttle arm will have to be connected to your throttle linkage and is designed to fit most 1976 and earlier GM cable setups with no adapters.
If you’re working with other makes, adapters are available for Ford and Chrysler applications. 1977 and later GM will use an 8009 stud instead of a ball stud. The accelerator pump is activated by this link, and this connection has three possible adjustments.
Because this arm acts as a lever, the inner hole will provide the largest shot of fuel, the middle is a normal shot, and the outermost will send the least amount of fuel. In most cases, leaving it in the factory position will be sufficient as that position is matched to the CFM rating of the carburetor.
The accelerator pump is activated by this link, and this connection has three possible adjustments. Because this arm acts as a lever, the inner hole will provide the largest shot of fuel, the middle is a normal shot, and the outermost will send the least amount of fuel. In most cases, leaving it in the factory position will be sufficient as that position is matched to the CFM rating of the carburetor.

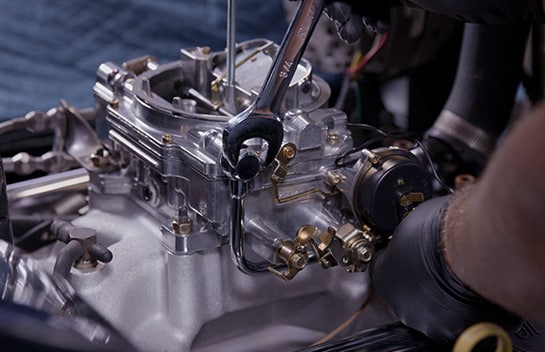
At the front of the carburetor are several vacuum connections. The lower 3/16-inch full-time vacuum source will usually be connected to your automatic transmission modulator, if your vehicle is so equipped. This is also where you connect a vacuum gauge for tuning.
The 3/16-inch timed port, which is a little higher up and on the passenger side, will be connected to the distributor’s vacuum advance. There’s also a large vacuum tube in the center of the carburetor for the positive crankcase ventilation, or PCV, system.
The 3/16-inch timed port, which is a little higher up and on the passenger side, will be connected to the distributor’s vacuum advance. There’s also a large vacuum tube in the center of the carburetor for the positive crankcase ventilation, or PCV, system.
|
Do It Right: If any of these connections aren’t going to be used, make sure to cap them off to prevent vacuum leaks which could cause your new carburetor to run lean and idle too high. On the front of the carburetor are the idle mixture screws that we’ll be using later. From the factory, these are set to an air flow target so don’t touch them just yet. If the carburetor has been used before, screw them in until they lightly bottom out, then back them out 1-1/2 turns. This is usually a good base setting to get the car running before fine-tuning the mixture. |

On the back of the carburetor is a threaded vacuum hole. If you need this hole for power brakes, use a 3/8 hose x ¼-inch pipe brass fitting.
If your power brake vacuum line uses intake manifold vacuum, go ahead and plug this hole with the ¼-inch pipe plug supplied in the kit. In either case, use fuel-compatible thread sealer on the threads.
If your power brake vacuum line uses intake manifold vacuum, go ahead and plug this hole with the ¼-inch pipe plug supplied in the kit. In either case, use fuel-compatible thread sealer on the threads.
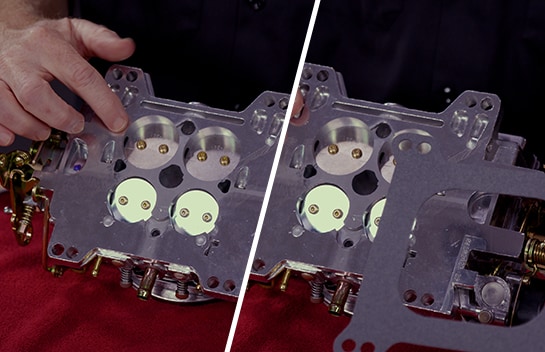
On the bottom of the carburetor, you can see the equal size throttle bores, hence the name square bore for this style of carburetor. The kit includes a new gasket, and making sure this fits your intake manifold without any obvious pathways for leaks is a good step before starting your installation.
To fit a spread bore style intake manifold, like a Quadrajet, you’ll need an adapter plate such as the Edelbrock 2696. In our case, we’re mounting this carburetor to an Edelbrock RPM Air Gap intake, so we already know it’s a perfect fit.
To fit a spread bore style intake manifold, like a Quadrajet, you’ll need an adapter plate such as the Edelbrock 2696. In our case, we’re mounting this carburetor to an Edelbrock RPM Air Gap intake, so we already know it’s a perfect fit.

On the right side of the carburetor, we see the electric choke assembly. This will need to be connected to power to allow it to open the choke to control the engine’s air mixture as it warms up to operating temperature. The choke is set from the factory and should only be adjusted if necessary.
This side also has the fuel inlet, and the kit supplies a straight fitting that connects to a fuel hose to deliver fuel to the carburetor. Since we picked up an inlet pipe and fuel filter, we’ll be installing those instead.
This side also has the fuel inlet, and the kit supplies a straight fitting that connects to a fuel hose to deliver fuel to the carburetor. Since we picked up an inlet pipe and fuel filter, we’ll be installing those instead.
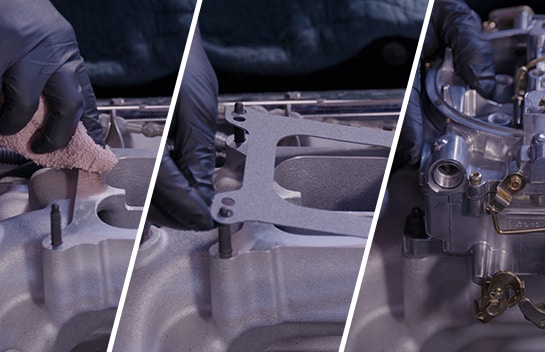
Step 1: Install Your New Gasket and Carburetor
Make sure the intake sealing surface is clean and free from old gasket material, oil, and fuel. Now install your new gasket and the carburetor.

Step 2: Secure Your Carburetor
Thread the carburetor nuts over the studs by hand, and then use a ½” socket and tighten them in a crisscross pattern in several steps until snug. Do not overtighten these nuts, as this can cause damage to the body of the carburetor.

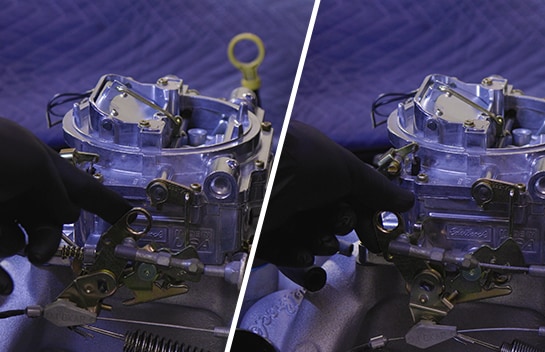
Step 3: Link the Throttle Arm
Connect the throttle and kickdown linkage to the throttle arm.
|
Do It Right: You’ll also need to install an external return spring, which closes the carburetor valves when the throttle pedal is released. |
Step 4: Press the Accelerator
Press on the accelerator to make sure everything is set up properly. With the pedal fully depressed, the butterfly valves are fully open, and as you releases the throttle, we see that the valves fully close and that the idle speed screw is contacting the lever.
Do this again with the air cleaner in place. If you notice any binding in the pedal, or if the throttle arm doesn’t fully return, you may need to check your accelerator pedal, the cable or the throttle arm for any interference issues.
Do this again with the air cleaner in place. If you notice any binding in the pedal, or if the throttle arm doesn’t fully return, you may need to check your accelerator pedal, the cable or the throttle arm for any interference issues.
Step 5: Connect the Fuel Line to the Carburetor
Install the fuel line to the carburetor. There are a variety of fittings that can be used for this, but we’ll be using our inlet pipe and fuel filter mentioned earlier to simplify the installation.

Step 6: Connect the Electric Choke
On the right side of the carburetor, we see the electric choke assembly. This will need to be connected to power to allow it to open the choke to control the engine’s air mixture as it warms up to operating temperature. The choke is set from the factory and should only be adjusted if necessary.
This side also has the fuel inlet, and the kit supplies a straight fitting that connects to a fuel hose to deliver fuel to the carburetor. Since we picked up an inlet pipe and fuel filter, we’ll be installing those instead.
This side also has the fuel inlet, and the kit supplies a straight fitting that connects to a fuel hose to deliver fuel to the carburetor. Since we picked up an inlet pipe and fuel filter, we’ll be installing those instead.
|
Do It Right: Make sure that your distributor advance, PCV hose, and other vacuum lines are hooked to the carburetor, or that the vacuum tubes are capped. |

Step 7: Start Your Vehicle
You should be ready to start the engine. If your car has an electric fuel pump, turn the key to the Run position to allow it to fill the carburetor bowls.
If using a mechanical pump, disconnect the coil wire and crank the engine for 10-15 seconds to fill the fuel bowls. Check carefully for any signs of a fuel leak and repair them before moving forward.
If everything is okay, press the pedal to the floor once and release fully. Now start the engine with your foot off the pedal.
Check again for leaks and let the engine warm up to operating temperature. Quickly press the accelerator pedal and release it to bring the engine off of the fast idle once it has begun to warm up.


At O’Reilly Auto Parts, we make it easy to find all the tools and parts you need to replace a carburetor, including carburetor rebuild kits, mounting bolts, and carburetor cleaner. Our step-by-step video will show you the essentials for disconnecting fuel lines, removing the old carburetor, and properly installing your new Edelbrock carb. Get your engine running smoothly again with O’Reilly Auto Parts, along with more helpful How-To content including information about the best fuel additives, how to choose spark plugs, and much more. Unsure you can tackle this job yourself? Let us recommend a professional shop near you to help you get the job done right.
The automotive repair work depicted in this series is performed under the direction of the manufacturer of the product featured. Prior to undertaking any of the demonstrated repairs on your vehicle, we suggest you consult with a certified mechanic or another professional who can adequately advise you of the proper repair or remedy required. O’Reilly Automotive Stores, Inc. and its affiliates (“O’Reilly”) disclaims any responsibility for injury or damage resulting from a viewer’s attempt to recreate the repairs shown in this series.