Warning Sorry, you're using a web browser that is no longer supported. For the best experience please upgrade or visit the site on another browser.
Skip to content

How to Replace the Headlight Bulbs on a 2012 to 2017 Toyota Camry

Your Toyota Camry's headlights improve your visibility when driving at night or in poor weather conditions, while also signaling your vehicle's direction on the road to other drivers. If your headlight bulbs are dim, flickering, or damaged on your 2012-2017 Toyota Camry, it's important to perform a straightforward bulb replacement to stay safe on the road. It is recommended that both headlight bulbs be replaced at the same time, as they tend to experience the same amount of wear over time. Malfunctioning headlights not only compromise your ability to see, but can also jeopardize your Camry's visibility to other drivers. With these step-by-step instructions to guide you through the process of replacing the headlight bulbs on your 2012 to 2017 Toyota Camry, you can perform this repair yourself to see clearly and stay safe on the road.

Tools & Materials List
Step by Step Instructions
Additional Resources

Tools & Materials

Steps to Replacing the Headlight Bulb on Your Camry

The headlights of your Toyota Camry are crucial to providing visibility during night driving or in adverse weather conditions, as well as signaling your vehicle's direction on the road and keeping it operating legally. When addressing issues with dim or malfunctioning headlight bulbs on your 2012-2017 Toyota Camry, performing a straightforward replacement is essential for maintaining your safety on the road. It is recommended that both headlight bulbs be replaced at the same time, as they tend to wear out at around the same age and are always used in tandem. Malfunctioning headlights not only compromise your ability to see, but can also jeopardize your Camry's visibility to other drivers. Our comprehensive instructions guide you through the step-by-step process of replacing headlight bulbs on your 2012 to 2017 Toyota Camry, to help you perform this repair yourself and see clearly on the road.
A white Toyota Camry is parked on the O’Reilly garage floor.

Step 1: Prepare Your Camry

Pop the hood and locate the first bulb you want to change. The low-beam bulbs on each side should be toward the outside of the engine compartment.
Our expert removes one of the Camry’s headlight bulbs.

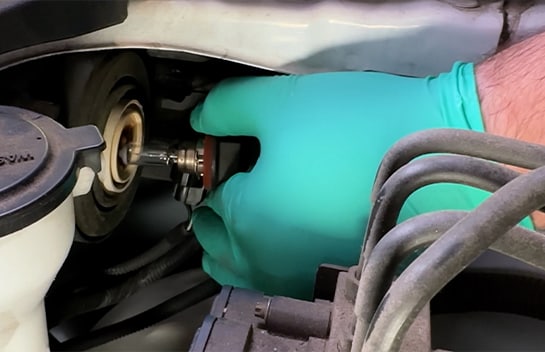
Step 2: Remove Your Old Bulb

Press the tab on the wiring harness to disconnect it from the bulb. Turn the bulb counterclockwise to slip the bulb’s tabs out of the assembly and remove the bulb.
Our expert holds up both the new and old bulb to compare them.


Do It Right: When you install the new bulb, be sure to wear protective gloves to avoid touching the bulb's glass with your bare fingers. Finger oils or grease can create hot spots on the bulb that can cause it to burn out prematurely.

A new headlight bulb is installed into the Camry.

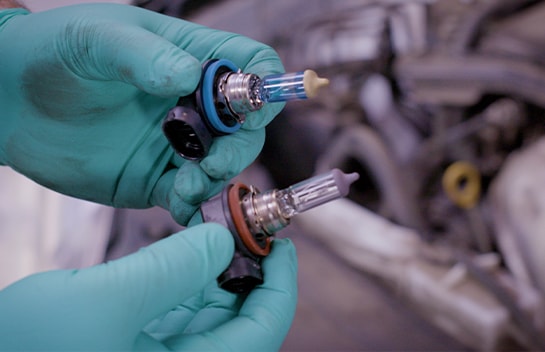
Step 3: Reinstall Your New Bulb

The new bulb will have tabs that slip into the assembly then turn it clockwise to secure it. Click the wiring harness back into place once the bulb is secure in the assembly.

Do It Right: It’s always recommended to change headlight bulbs in pairs, so repeat these steps on the other side.

The Toyota Camry is started and the headlights are turned on to check the new bulbs’ quality.

Step 4: Check Your New Bulbs

Turn on the headlights to make sure your new bulbs are working properly.

Additional Resources

Our detailed instructions and video demonstrate the headlight bulb replacement process for a 2017 Toyota Camry SE, and procedures will be similar on 2012, 2013, 2014, 2015, and 2016 Camry models.

Ensuring your Toyota Camry abides by state road laws and remains visible to other drivers is vital. If you observe dimness, burned out bulbs, or erratic functionality or performance from your Camry's headlight bulbs, prompt replacement of both bulbs should be a priority. O’Reilly Auto Parts offers a range of headlight bulbs, tail light bulbs, and other exterior light bulbs to fit 2012-2017 Toyota Camry models, allowing you to perform this job easily yourself.

The automotive repair work depicted in this series is performed under the direction of the manufacturer of the product featured. Prior to undertaking any of the demonstrated repairs on your vehicle, we suggest you consult with a certified mechanic or another professional who can adequately advise you of the proper repair or remedy required. O’Reilly Automotive Stores, Inc. and its affiliates (“O’Reilly”) disclaims any responsibility for injury or damage resulting from a viewer’s attempt to recreate the repairs shown in this series.