
 Safety glasses
 Nitrile Gloves
 Thermostat
 Antifreeze & Coolant
 Drain Pan
 Ratchets
 Sockets
 Shop Towels

Step 1: Disconnect the Negative Battery Cable
Start by parking on a level surface and let your vehicle cool. Once cooled, disconnect the negative battery cable.
|
Do It Right: It’s important to note that the thermostat is not serviceable separately. The thermostat housing and thermostat must be replaced as an assembly. |

Step 2: Slowly Remove the Surge Tank Cap
Slowly rotate the surge tank fill cap counterclockwise. Stop rotating and allow the hissing to stop. After the hissing stops, continue turning counterclockwise to remove the cap.

Step 3: Position the Drain Pan
Put the drain pan in place under the vehicle.

Step 4: Open Radiator Petcock and Drain Completely
Once the drain pan is in place, open the petcock and allow the system to drain completely. After it is drained, close the radiator petcock.

Step 5: Remove Engine Cover
Take off the engine cover by loosening the intake manifold sight shield bolt and remove the cover from the cover retainer. Remove the cover retainer bolts and the retainer, if required.

Step 6: Remove Air Cleaner Outlet Duct
Then, loosen the air cleaner outlet duct clamps at the throttle body and mass airflow/intake temperature sensor. Remove the radiator inlet hose clip from the outlet duct and then remove the air cleaner outlet duct.

Step 7: Detach the Radiator Hose Clips
Detach the radiator vent inlet hose from the radiator hose clips.

Step 8: Remove the Radiator Vent Inlet Hose
Loosen the inlet hose clamp and remove the inlet hose from the water pump.
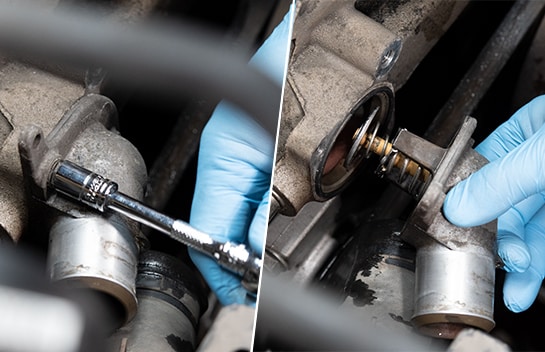
Step 9: Remove the Thermostat from Water Pump
Remove the two bolts that hold the water pump outlet and thermostat in place, and pull the thermostat from the water pump.

Step 10: Install the New Water Pump Outlet
Install the new water pump outlet, which includes the coolant thermostat.
|
Do It Right: Make sure and use the new thermostat O-ring. |

Step 11: Tighten Bolts to the Water Pump
Tighten the bolts to 11 foot pounds to secure the new water pump outlet in place.

Step 12: Reinstall the Hoses
Install the outlet hose and hose clamp on the water pump outlet.

Step 13: Tighten Clips to Radiator Hose
Tighten clips to radiator hose, then tighten remaining hoses to water pump.

Step 14: Reinstall Air Cleaner Outlet Duct
Install the air cleaner outlet duct. Tighten the air cleaner outlet duct clamps at the throttle body and MAF/IAT sensor to 62 inch pounds.
|
Do It Right: Be sure the arrow at the throttle body end of the duct is in alignment with the throttle body attaching stud. |

Step 15: Reinstall Engine Cover
If necessary, install the engine cover by putting it in place and securing it with the retainer bolts, if required. Tighten the bolts to 44 inch pounds. Install the engine cover.
|
Do It Right: Don’t let the cover contact the manifold absolute pressure sensor wire harness connector. |

Step 16: Refill the Cooling System
Refill the cooling system, and reinstall the reservoir cap. Be sure to follow your vehicle manufacturer's specifications for coolant, type, ratio and fill procedure.

Step 17: Reconnect the Battery Cable
Reconnect your negative battery cable. Start your vehicle, and let it warm up to operating temperature with the heater on. If the heater is blowing warm air, turn the truck off and check the coolant level. Add coolant as needed, then close the hood. Before moving your vehicle, make sure to remove the drain pan from under your vehicle.


The automotive repair work depicted in this series is performed under the direction of the manufacturer of the product featured. Prior to undertaking any of the demonstrated repairs on your vehicle, we suggest you consult with a certified mechanic or another professional who can adequately advise you of the proper repair or remedy required. O’Reilly Automotive Stores, Inc. and its affiliates (“O’Reilly”) disclaims any responsibility for injury or damage resulting from a viewer’s attempt to recreate the repairs shown in this series.