Warning Sorry, you're using a web browser that is no longer supported. For the best experience please upgrade or visit the site on another browser.
Skip to content

How to Replace the Brake Pads and Rotors on a 2013 to 2018 Nissan Altima

The front brake pads and rotors on your 2013 to 2018 Nissan Altima help slow your car down when you apply the brakes. This video and instructions detail a front brake pad and rotor replacement on a 2014 Nissan Altima, and repair procedures will be similar for 2013, 2015, 2016, 2017, and 2018 Nissan Altima models. Be sure to consult your service manual for exact replacement specifications before starting your repairs. Maintain or repair your Nissan Altima’s front brakes with tools, resources, and information from O’Reilly Auto Parts. For automotive advice and instructional videos, visit our How-To Hub for topics including when to change your brakes, how to choose brake pads, and more to help you get the job done right.

Tools & Materials

Instructions to Replacing the Brakes and Rotors on your Nissan Altima

Your 2013-2018 Nissan Altima’s front brake pads and rotors help slow down your vehicle when you apply the brakes. As you press the brake pedal, the brake pads are pushed against the rotors, using friction to slow your wheels and stop your Altima. Brake pads and rotors wear out over their life due to heat, exposure to moisture and road debris, and general use, affecting the responsiveness and overall safety of your Nissan’s braking system. Signs of bad brake components include a grinding, squeaking, or squealing noise heard when applying the brakes, or if you notice pulsation or vibration in the brake pedal. Performing a complete brake job on your 2013-2018 Nissan Altima by replacing your brake pads, rotors, and hardware can help restore and maintain healthy brakes. It’s advised you replace the brake pads and rotors on both sides at the same time, since these components are likely the same age and may fail at similar intervals. Bad brake pads and rotors can affect braking distance and cause poor or unsafe handling in your Nissan Altima, which could put you and others in danger. Our helpful, step-by-step video and instructions can help you perform a complete brake job on your 2013 to 2018 Nissan Altima to restore optimal, safe braking performance.


Remove Your Old Rotor

In two images, our expert uses a breaker bar to loosen the front wheel lug nuts on a 2014 Nissan Altima.

Step 1: Prepare Your Altima

Park on a level surface. Use a breaker bar and a 21mm socket or lug wrench to loosen the lug nuts on your front wheels.
The Altima's back wheels are chocked and the front end is lifted using a Power Torque jack.

Chock the rear wheels. Lift and support the front end of the car. Remove the lug nut and the front wheels.
In three images, our expert uses a ratchet and socket to loosen the caliper mounting bolts and then unscrews the bolt the rest of the way by hand.

Step 2: Remove Your Caliper Mounting Bolts

Use a ratchet and 14mm socket to loosen the two caliper mounting bolts and remove them.
The caliber is suspended in the wheel well using a caliper hanger.

Slide the caliper out of the bracket and use the caliper hanger to suspend it in the wheel well, making sure there’s no pressure on the brake hose. Use your ratchet and 22mm socket to loosen the caliper bracket bolts. Remove the bolts and the caliper bracket.
Our expert removes the old rotor from the Altima.

Step 3: Remove the Old Rotor from Your Vehicle

You can leave the old pads in the bracket for now. Remove the old rotor from the hub.

If it’s seized to the hub, use a hammer to knock it loose. Keep in mind this will damage the rotor surface, and it likely won’t be able to be resurfaced, so a replacement rotor will be needed.

Install Your New Rotor

In three images, our expert cleans rust and dush off, then applies silicone brake grease to, the wheel hub.

Step 4: Clean and Grease Your Wheel Hub

Once you’ve removed the old rotor, use a wire brush to remove any rust from the hub and a wheel stud brush to scrub any rust off the threaded studs. Wipe any dust from the hub and bolts.

Adding silicone brake grease to the hub before installing your new rotor will make it easier to remove it during your next brake service.
Our expert inspects the brake caliper bracket for any rust.

Step 5: Remove Your Old Brake Pads

Remove the old pads and hardware from your caliper bracket and give the bracket a visual inspection. If the bracket is extremely rusty where the pads or hardware will sit, it needs to be replaced.
In two images, the slide pins are removed from the brake caliper bracket.

Step 6: Remove Your Slide Pins

Remove the slide pins, noting that the slide pin from the bottom of the bracket has a rubber boot at its tip and the top pin does not.

Do It Right: If the pins are corroded or pitted, they should be replaced.

Brake cleaner is sprayed on the caliper bracket.

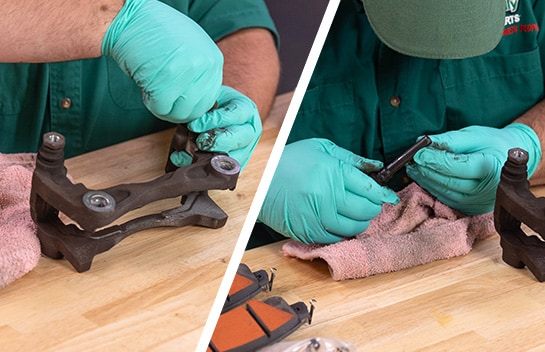
Step 7: Clean Your Caliper Bracket

Spray the bracket down with brake cleaner, but don’t use a wire brush to clean it as this can lead to further damage. While the bracket is drying, use brake cleaner and a shop towel or rag to wipe any oils from the friction surface of your new rotor, if needed. Once you’ve cleaned the rotor, mount it on the hub and use a lug nut to hold it in place while you continue to work.

Do It Right: Brake cleaner will strip paint, so be careful where you spray it.

In two images, our expert greases the slide pins before reinstalling them to the caliper bracket.

Step 8: Grease Your New Bracket Hardware

Apply some of your 100% silicone grease to the caliper bracket where the new brake hardware will sit. Install your new hardware at the top and bottom of the bracket, making sure it’s completely secure.
Our expert reinstalls the slide pins into the caliper bracket.

Step 9: Reinstall Your Slide Pins

Wipe down the slide pins and apply fresh silicone grease. Reinstall the pins remembering that the pin with the rubber boot goes at the bottom end of the bracket and make sure both pins glide smoothly.
In two images, new Import Direct brake pads are installed into the brake caliper bracket.

Step 10: Install Your New Brake Pads

Install your new brake pads in the bracket. You’ll notice the pads have metal clips at one end of them; these clips go at the top end of the bracket.
The brake caliper bracket is reinstalled to the Altima's wheel hub.

Step 11: Reinstall Your Caliper Bracket

Once you’ve installed the slide pins, brake hardware, and pads, it’s time to reinstall the bracket.

Lift it into place with the pads on either side of the rotor and thread the top 22mm bolt by hand.

Once the top bolt is in place, thread the bottom bolt as well.
In two images, our expert uses a ratchet and socket to tighten the bolts securing the caliper bracket.

Step 12: Secure Your Caliper Bracket

Use your ratchet and 22mm socket to tighten the bolts then use your torque wrench to tighten those bolts to 91 foot-pounds.
In two images, our expert sprays brake cleaner onto a rag and wipes the surface of the caliper piston.

Step 13: Clean Your Caliper Piston

Clean the exposed portion of your caliper piston with brake cleaner on a towel or rag.

If the rubber boot is cracked or if there’s brake fluid leaking, the caliper needs to be replaced.
A brake caliper compressor tool is used to compress the new brake caliper and make sure it's flush with the housing.

Step 14: Compress Your New Caliper

Compress the brake caliper with a brake caliper compressor tool. Use an old brake pad to protect the piston. When you’re done, the piston should be flush with the housing.
In three images, our expert places the newly-cleaned caliper back onto the wheel hub, then fastenes the mounting bolts with their hands.

Step 15: Position Your Caliper Properly

Move the caliper into place over the pads, making sure the brake hose isn’t twisted. Thread the two mounting bolts by hand, starting with the top bolt.
A ratchet and socket is used to tighten the bolts.

Use your ratchet and 14mm socket to tighten them. Once they’re snug, torque these bolts to 20 foot-pounds.
In two images, our expert reinstalls the Altima's wheels and tighten the bolts to secure it in place.

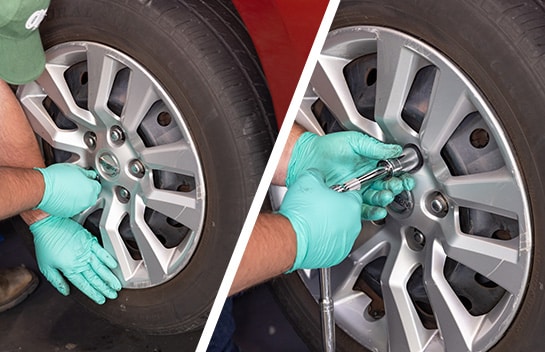
Step 16: Reinstall Your Wheel

If you used a lug nut to keep the rotor in place, you can remove it now as well as your caliper hanger. Reinstall the wheel and tighten the lug nuts until the wheel is secure against the rotor.

Do It Right: It’s always a good idea to change brake pads and rotors in pairs, so repeat these steps on the other side.

Final Tutorial Steps

The Altima's front end is lowered so it's level on the ground. Our expert removes the back wheel chocks.

Step 17: Lower Your Altima

Lower the front end and remove the wheel chocks. Use your 21mm socket and torque wrench to tighten the nuts in a star pattern to 83 foot-pounds.
In two images, our expert tests the new brakes by pressing the brake pedal and checks the master cylinder to see if more brake fluids is needed.

Step 18: Test Your New Brakes

Now that your brake job is complete, BEFORE driving anywhere, be sure to pump your brake pedal several times until you feel the pressure return. Some brake fluid was pushed out when you compressed your caliper pistons, so check your master cylinder and add fluid as needed.

If your brake pedal feels spongy, you could have air in one or both of your front brake lines. Check out our video on how to bleed those lines to remove the air if needed.

When breaking in the new components, it’s a good idea to test drive your vehicle, slowing it thirty times from 30 mph with moderate brake pressure. This allows the brakes to cool for about thirty seconds in between each slowdown. Try to avoid aggressive stops during this break-in process. Your brakes may smell after you’ve done this, and that’s normal. If the odor persists past 500 miles or so, or if you have excessive dust on a wheel, you may have a stuck caliper.

Additional Resources

The front brake pads and rotors on your 2013 to 2018 Nissan Altima help slow your car down when you apply the brakes. This video and instructions detail a front brake pad and rotor replacement on a 2014 Nissan Altima, and repair procedures will be similar for 2013, 2015, 2016, 2017, and 2018 Nissan Altima models. Be sure to consult your service manual for exact replacement specifications before starting your repairs. Maintain or repair your Nissan Altima’s front brakes with tools, resources, and information from O’Reilly Auto Parts. For automotive advice and instructional videos, visit our How-To Hub for topics including when to change your brakes, how to choose brake pads, and more to help you get the job done right.


The automotive repair work depicted in this series is performed under the direction of the manufacturer of the product featured. Prior to undertaking any of the demonstrated repairs on your vehicle, we suggest you consult with a certified mechanic or another professional who can adequately advise you of the proper repair or remedy required. O’Reilly Automotive Stores, Inc. and its affiliates (“O’Reilly”) disclaims any responsibility for injury or damage resulting from a viewer’s attempt to recreate the repairs shown in this series.