Warning Sorry, you're using a web browser that is no longer supported. For the best experience please upgrade or visit the site on another browser.
Skip to content

How to Change the Tail Light Bulbs in a 2010 to 2014 Subaru Outback

These step-by-step instructions and video explain how to replace the tail light bulbs on 2010, 2011, 2012, 2013, and 2014 Subaru Outback models. This video and instructions detail a tail light bulb replacement on a 2011 Subaru Outback 2.5i Limited and will be similar to most other 2010-2013 Subaru Outback models. Replacing a burned out, dim, or failing tail light bulb ensures you are not only following the law but also helps communicate your vehicle’s presence and intended direction to other drivers to keep you safer on the road. If you notice that your 2010 to 2014 Outback’s tail light bulbs are malfunctioning, not working, or are not as bright as they should be, you should replace both tail light bulbs as soon as possible to ensure your vehicle remains visible and safe.

Tools & Materials

Learn How To Replace A 2010 to 2014 Subaru Outback Tail Light Bulb

Your Subaru Outback’s tail lights help other drivers see that you are in front of them, and some tail light bulbs also have a second filament that illuminates your brake lights, tail lights, or turn signals when appropriate to maintain proper visibility and safe driving.

It’s recommended that you replace both tail light bulbs on your 2010 to 2014 Outback at the same time, even if only one bulb has failed, since the bulbs are likely the same age and are likely to fail or burn out around the same time. If you need help with another light bulb replacement, O’Reilly also offers FREE bulb installation with purchase on most vehicles to help save you time and money.

If you’re not completely comfortable doing this yourself, we’d be happy to recommend a professional technician in your area.


A two-image split of a white Subaru Outback parked with the back hatch open.

Step 1: Prepare Your Vehicle

Make sure your Subaru is parked on a flat, solid surface and open the back hatch.
A two image split of our expert removing the screws that secure the tail light assembly cover.

Step 2: Remove the Tail Light Assembly Cover

Using a philips head screwdriver, remove the screws holding the tail light assembly. If needed, you may need use a tool to pry the assembly out.
A two-image split of our expert removing the screws securing the tail light assembly and removing the assembly from the frame.

Step 3: Remove the Tail Light Assembly

Use your screwdriver to remove the screws holding the assembly to your vehicle. You should now be able to remove the assembly from the vehicle.
A two-image split of the tail light assembly being disconnected.

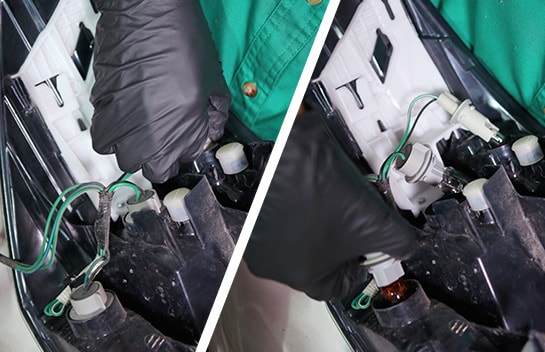
Step 4: Disconnect the Tail Light Assembly

Carefully disconnect and remove the bulbs from the assembly.
A two-image split of the old tail light being replaced with the new bulb.

Step 5: Remove Old Tail Light Bulb
Remove each bulb from the assembly by turning them counterclockwise and lift out carefully. Set the assembly aside and remove the bulb that needs to be changed.
The new tail light bulb is being testing to ensure it’s working properly.

Step 6: Install New Tail Light Bulb
Remove each bulb from the assembly by turning them counterclockwise and lift out carefully. Set the assembly aside and remove the bulb that needs to be changed.
A two-image split of the bulbs and assembly being installed.

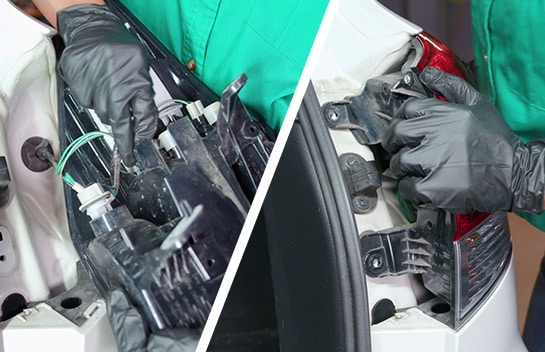
Step 7: Reinstall the Tail Light Assembly

Reinstall the bulbs and assembly, making sure the tabs are aligned. The entire unit should slide firmly into place.
A two image split of the tail light assembly being aligned and secured to the vehicle.

Secure the assembly using the fasteners you removed earlier. Reinstall the panel and secure it by pushing the tabs back into place.

Do It Right: Because tail lights should always be changed in pairs, repeat these steps on the other side.


Close the back hatch once both tail lights have been replaced and the assemblies are secure.

Additional Resources

These step-by-step instructions and in-depth video explain how to replace the tail light bulbs on a 2010, 2011, 2012, 2013, or 2014 Subaru Outback models. Replacing a burned out, dim, or failing tail light ensures you are following state laws, and helps communicate your vehicle’s presence and intended direction to other drivers to keep you safer on the road. If you notice that your 2010 to 2014 Outback’s tail light bulbs are malfunctioning, not working, or are not as bright as they should be, you should replace both tail light bulbs as soon as possible to ensure your vehicle remains visible and safe.


The automotive repair work depicted in this series is performed under the direction of the manufacturer of the product featured. Prior to undertaking any of the demonstrated repairs on your vehicle, we suggest you consult with a certified mechanic or another professional who can adequately advise you of the proper repair or remedy required. O’Reilly Automotive Stores, Inc. and its affiliates (“O’Reilly”) disclaims any responsibility for injury or damage resulting from a viewer’s attempt to recreate the repairs shown in this series.